
Recently, my nephew celebrated his very first birthday and I, of course, took that as an opportunity to capitalize on that fact that my sister wanted an extremely health conscious party. That meant no cakes, no dairy, no cookies, all just healthy food. This may seem like a boring idea, but what started as a daunting task, turned out to be a very successful, healthy birthday party complete with vegan cupcakes, strawberry banana smoothie cups, fruit platters and, yes, an ice cream cake!
This cake was created on the spot, with me writing down the basic ingredients the night before. I had a general idea of what I was going to do, and I knew I wanted it to be ALL fruit, no nuts. This is because when you are serving food for a large party, chances are a few people in the group will be allergic to nuts. And the fact that a lot of children would be at this party eating my cake, I was NOT going to take the chance of one of them suffering an allergic reaction. Right away this idea ruled out my Apricot Nut Cake, Coconut Blueberry “Cheesecake,” and my classic Vegan Carrot Cake. So, it was time to get to drawing board! Lucky for me I already had a bag of dried figs that I had been wanting to use, and of course, I always have some dates on hand. So the rest, was just coming up with the filling! Needless to say, this recipe came out great, and my sister was really happy with it.

So…let us begin!
You will need a 10 inch baking pan with a removable bottom, a high powered blender, spatula and…a hammer (you’ll see why below).
For the ooey, gooey crust, you will need:
- 1 cup pitted dates
- 2 cups dried figs, stems removed and soaked overnight in 4 cups water
- 1/3 cup almond meal
For the raspberry layer you will need:
- 2 cups fresh or frozen raspberries
- 4 dates
- 3 bananas
For the coconut layer you will need:
- 1 fresh coconut
- 1/3 cup coconut milk
- 2 bananas, fresh or frozen
- 1 tsp vanilla
For the mango layer you will need:
- 2 cups mangoes, fresh or frozen
- 2 bananas
- 1 tsp vanilla
- optional: couple drops of stevia or 1 tbsp coconut sugar
You will also want a to make a whipped cream topping. You can find an excellent coco-whip cream at your local health food store, or, to make your own, click here and follow my recipe instructions .
Step 1:
First you want to make your crust for the bottom layer. Drain your soaked figs and add into your high powered blender along with the almond meal and dates. Blend the mixture together until it forms an ooey, gooey, yummy crust. Spread in the bottom of your cake pan, then put in the freezer to freeze.

Step 2:
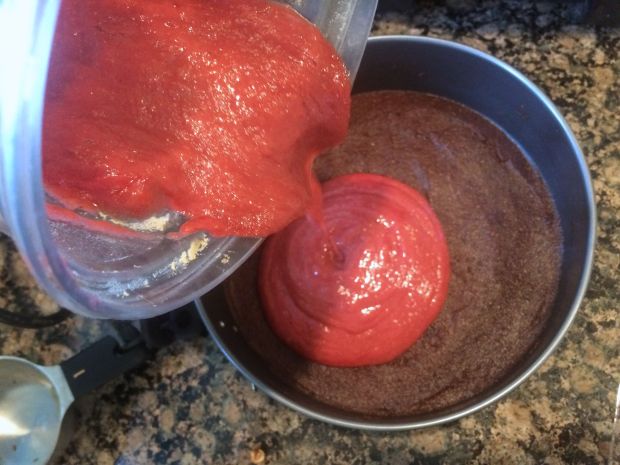
As your base is freezing, it’s time to make the next fruit layer, raspberry! Don’t bother washing out your blender, as the sweet base will help to add some extra sweetener to your raspberry mixture! Go ahead and add in the raspberries, bananas and dates. Blend on high until everything is fully mixed. Take out your cake pan from the freezer, and pour the mixture over your bottom layer:
Step 3:
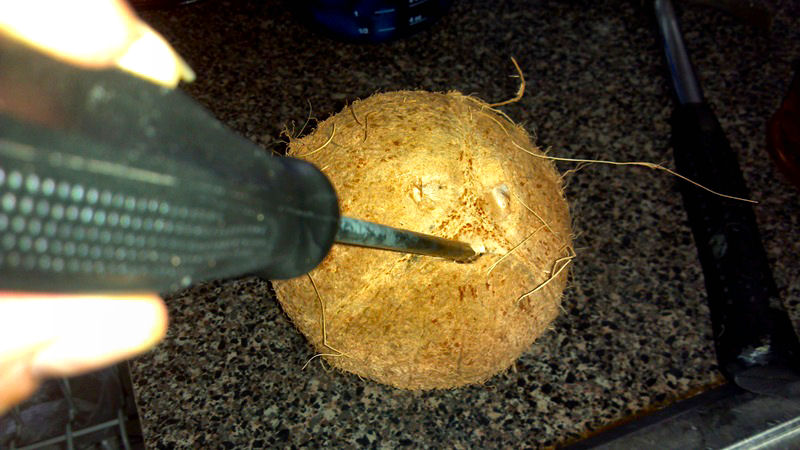
Now comes the fun part, making the coconut layer! With your hammer and screwdriver, hammer three holes into the three dents at the end of the coconut:
Next, drain the water out into a cup. You can use this for the coconut base instead of the coconut milk if you prefer:
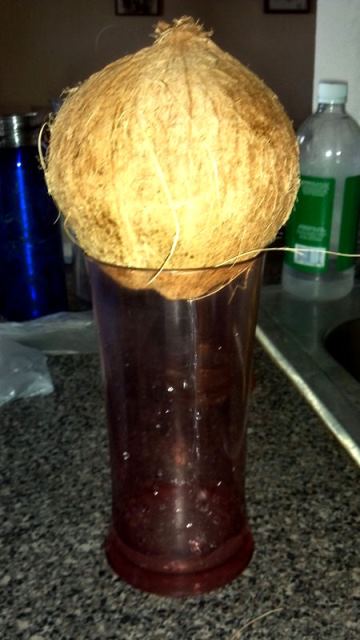
Next, place your empty coconut down sideways on a folded towel on your counter. With your hammer, bang a circle around the entire circumference of the coconut. Depending on how hard you bang around the middle of it, the coconut will eventually crack neatly in half, like below:
Ta daaa! You will now be able to scrape the meat out of coconut! Use a knife and spoon to scrape the meat out and measure 2 cups worth. One coconut usually yields exactly two cups worth of meat. Add this meat to your blender, along with the 2 bananas, coconut milk and vanilla. Blend this mixture, then pour it on top of the frozen raspberry layer. Put back in the freezer to freeze the next layer.

You may need to wait a bit for the raspberry layer to freeze, just so the coconut doesn’t mix into the raspberry layer. If you do want it to mix, then go ahead and add it in!
Step 4:
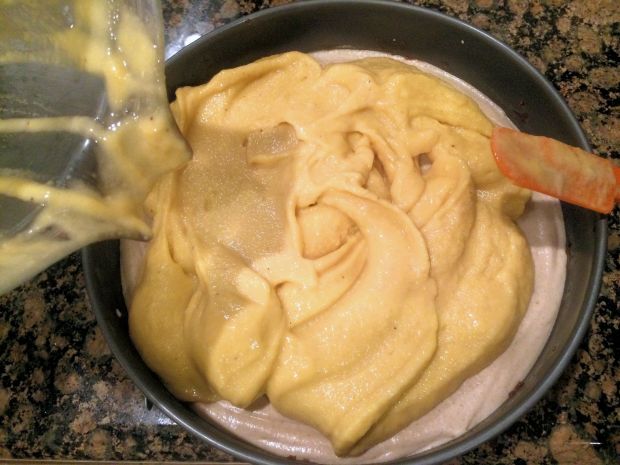
The final layer is our mango blend. You can use fresh or frozen mangoes, but ideally you want to use fresh mangoes that have had time to ripen. That way they will be sweet, juicy, and won’t need any extra sweetener. If you are on a time crunch or are cooking last minute like I was, frozen organic mango will do just fine. Add the mango, bananas, vanilla and sweetener to your blender. Blend together, then add this layer on top of the coconut layer.
Again, if you don’t want the layers to mix, you may need to wait about 10 minutes for the coconut layer to harden before pouring the mango on top. If not, then you are good to go!
Step 5:
Well, that’s pretty much it! Basically you just need to let it sit in the freezer for a couple hours for everything to harden.
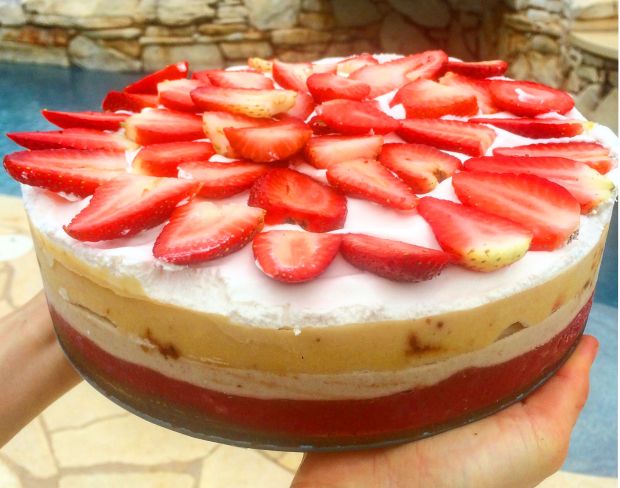
Once everything is frozen though, you want to add your coconut whip cream to the top, and any extra fruit like strawberries, coconut flakes, or berries. Cut the strawberries lengthwise, then put them around the cake, slowly heading in:
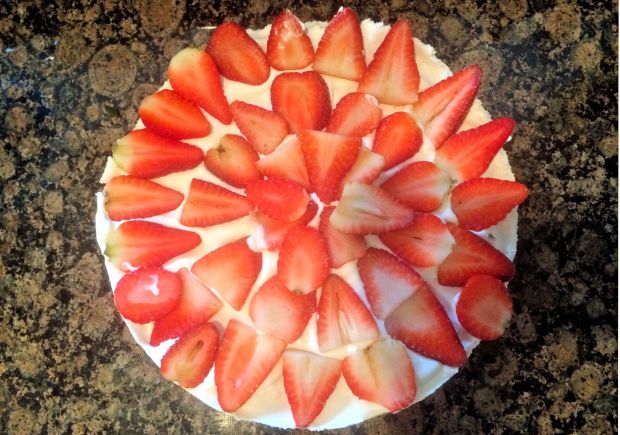
Final product, with all layers including the coconut whip cream and strawberries on the top, doesn’t that look great?

The best thing is that this cake is completely raw and nut free, so really, anyone can eat it.

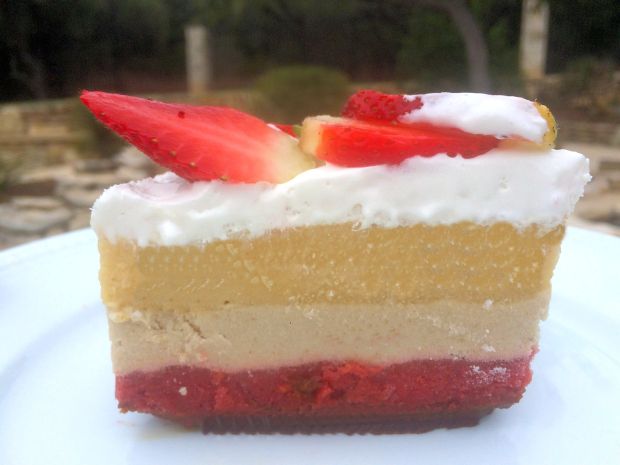
You can leave the cake out to sit for about 5 minutes before serving so it can soften, then you can cut it into nice, cake-like pieces like below:

Have a bite!

Enjoy!
